

Clear and level the ground before you so much as lift a hammer
So – now you’ve got the upright bits: what’s next?
Well, time to bolt it all together.
Before you do anything, clear and level the ground you’re going to place your bins on until it’s a flat piece of ground: this will be your workbench too, so make sure it’s easy to use.
Stand your ends up at each side (propped up on planks if you don’t have spare people to hold them) and then stand up the inserts too, measuring to make sure they are exactly 1.2m apart. Slipping a 1.2m plank across between the front slots helps.
Sides and inserts carefully positioned, and the first back board in place ready to cut to size
Once you’re happy, place your first 2.5m plank across the back of two of the bays. This is a really important stage to get right – so take your time.
Double-check the two bays are exactly 1.2m wide at the back, then cut the plank to fit so it runs across the back of both bays.
I find it all moves around too much if you try to nail it on while everything is still vertical, so at this point I prefer to tip the bays over onto their fronts so the backs are uppermost.

Bays tipped onto their fronts and the back starting to go on
Again, you’ll need to prop them upright using planks or people; and again, measure and re-measure to make sure they’re all 1.2m apart, and level (use a spirit level in both directions to make sure they’re absolutely upright, and also horizontal).
Now it’s much easier to line up the first plank across the back and nail it in place. Then cut a shorter length, a little over 1.2m, to fit across the back of the third bay, butting up nicely with the longer piece.
Once you’ve got those two pieces in place everything gets much easier. Work your way up the back, lining the planks up with the boards you used on the sides (you can use a spacer, but you usually don’t need to).

Stagger the joints between long and short back boards like bricks for extra strength
Stagger the joints like bricks, so the longer board starts on alternate sides – this gives the back a lot of strength. And if you’ve done the alternately overlapping boards thing on the sides, you fit one board so the end shows, and the next so it tucks in behind the side board (I didn’t take a pic of this so will add this after my next visit).
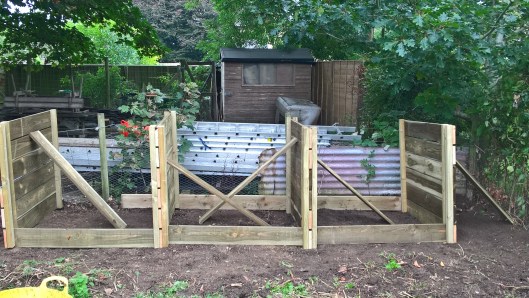
When you’re about halfway up, call in a couple of friends and get them to take a bay each, then tip the whole thing back upright (you’ll need one person in each bay as otherwise it can twist catastrophically out of shape).
Pause for a while to make sure absolutely everything is where it should be: your bins will be too heavy to move once you’ve finished, so make sure you’ve left access for maintenance all the way around, and that it’s all sitting level on the ground. Bricks under the corners can help the boards sit a little way off the ground so they don’t rot; they also help get everything level, too.
Once you’re happy that everything’s level and in the right place, you can finish off the back in situ (by now it’s all bolted firmly enough in place to be able to work upright).
Finally, slot the first board in to the front of each bay, and nail it in place through the back upright so that it’s fixed. This helps keep the bays square, and holds the compost in better, too.
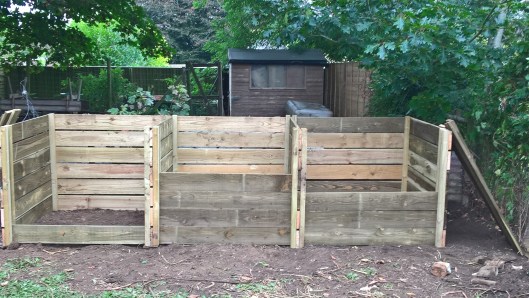 And that’s it! As you fill each bay with compost, just slot another plank down the front until it’s full. Then start the next one. Remember to turn regularly, and in six months or so you’ll have your first wheelbarrows of lovely home-made soil improver to work its magic on your garden.

Pingback: How to make a compost bin #1 | The Constant Gardener
Are they chemically treated wood planks?
Hello Horace, these were heat-treated planks – so no chemicals but a lot of carbon-hungry energy. I have more recently created a compost bin out of old pallet wood which is (usually) untreated so more eco-friendly, but tends to rot faster of course so needs replacing sooner.